Huawei Matebook X Pro (Complete Walkthrough) (Video)
Today Huawei launched a couple of devices with the most intriguing to me is the sequel to a laptop of theirs that I gave a glowing review to not that long ago: the Matebook X.
Well, now we have the Matebook X Pro. And since Huawei was kind enough to give me a very limited time with the device before release, I figured I’d try and do one of my complete walkthroughs. If you aren’t familiar, these are where I go through as many features of the device as I can so you have as much info as possible should you decide you want to maybe buy it in the future. Here we go.
Firstly, the styling. The device is available in a CNC machined aluminum body that comes in either Space Grey or Mystic Silver. It weighs about 1.33kg or 2.93 lbs so it’s definitely a light laptop.
Once you open it though, there’s something else you’ll notice immediately. The bezels, or lack of bezels, around the screen. Huawei says this device has a 91% screen-to-body ratio compared tot he 88% of the last one and 82% of the MacBook Pro.
That screen is an LTPS 13.9″ 3:2 aspect ratio with a maximum brightness of 450 nits, a sRGB 100% color gamut, 1500:1 contrast ratio, and a 3000×2000 pixel resolution. Oh, and it’s also a touchscreen utilizing Gorilla Glass now compared to the last model.
The keyboard is a similar clicky model like the last one but the trackpad is now larger and Huawei claims is the largest trackpad on a 14″ laptop. Also, thankfully, it is a glass covered Precision trackpad (if you aren’t familiar, Precision trackpads allow Windows to handle the drivers instead of the trackpad manufacturer and long story short make for a much more pleasurable trackpad experience along with added Windows baked in gestures, etc.).
Surrounding the keyboard and trackpad is four speakers that are Dolby Atmos and, I have to admit, get pretty damn loud.
The device also has 4 microphones with noise cancellation for recording audio.
On the left side, we have two USB-C ports, one with Power Delivery and the other supports Thunderbolt 3 as well as our headphone jack.
On the right, we have a regular USB port.
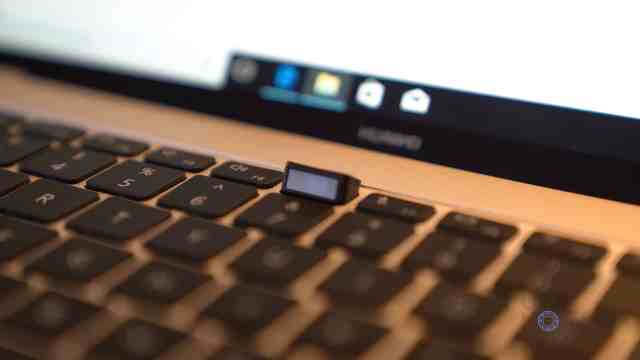
One thing you’ll notice missing looking around the screen though is the webcam. Huawei cleverly came up with a concept of putting it in the keyboard. You tap the camera key and up pops the 1MP camera. This means no more having to put tape over it if you’re privacy concerned but also means that the angle, while not as bad as you think it is for a camera so long, isn’t what I would call flattering.
To the right of this is the power button that also doubles as a fingerprint scanner that Huawei claims will get you from off to logged in in under 8 secs.
Powering the device is a choice of an 8th gen Intel Core i7-8550U processor or an i5-8250U paired with either 8 or 16GBs of LPDDR3 2133mhz RAM.
For power, Huawei gives you a choice of either the Intel UHD Graphics 620 or a more proper NVIDIA GeForce MX150 with 2GBs of GDDR5 memory.
For storage, you can choose from a 256GB or 512GB PCIe SSD and for connectivity, we have 802.11a/b/g/n/ac, 2.4/5GZ 2×2 MIMO, and Bluetooth 4.1.
The battery in here is a 57.4Wh Lithium Polymer battery that they claim will do 12 hours of video playback on a charge.
Software-wise it’s running Windows 10 so it’s the usual affair there but Huawei has added a few apps like a PC Manager to help with memory and battery usage, Microsoft Translator, a Monitor Manager, and an Eye Comfort Mode to reduce blue light.
And there we go, let me know what you think!


Pocketnow mentions you found a way to change the partition to eliminate fan noise on the Matebook X Pro. Can you maybe pass along that tip?? Thanks.
Hi there, yeah let me write a quick article on it cause you’re not the first to ask and it’s too long to put in a comment. Will post it this weekend, check back on the home page for it soon.
Thanks!
Awesome! Thanks!
Did he reply to you in private ? Would love to have the info too. Thank you !
Nope, not yet.
Check the featured comment now on this thread above.
Great! Thanks. Your walkthroughs are some of my fabfavortech videos .
Check the featured comment now on this thread.
Any chance you can pass along this info? Sorry, got my matebook x pro now and hoping to do this. Fan noise actually hasn’t been a huge problem but still want to look into this.
I think we’ll give up on waiting.
OK, sorry for the delay for those asking about the fixing of the running out of storage on the Huawei Matebook X Pro thanks to it’s weird partition setup. Was trying to reset the computer to get the old partitions back to then take screenshots explaining how to fix it but it won’t go back now.
Here’s how to do it anyway sans visuals:
1. Type “partition” into the start menu search and click on Create and format hard disk partitions.
2. You’ll see Windows (C:) and then another larger partition directly next to it. The Windows one is for the OS and the second one is for the user data (and this is the issue).
3. Backup everything from the computer you need to an external hard drive.
4. Right-click on the larger data partition and select Delete (might be called Erase, as well) Partition. Confirm that you want to and this will erase the data partition.
5. Now, right-click on the Windows (C:) partition and select Extend Volume.
6. Select the recently deleted partition when asked where you would like to extend it to and then confirm.
7. When its all done, you should have have one large Windows (C:) partition and the problem is solved.
Let me know how that goes.
Thanks, David.
I’m not clear on which one to delete. Only the first 2 (Disk 0 Partition 1 & 4) have the delete option, Windows(C:) does not. It seems that Windows(C:) is the one that needs to be deleted since it looks like the contiguous area for the expansion of the 100MB OS for Windows 10. But it does not have the ‘Delete’ option when right-clicked.
https://uploads.disquscdn.com/images/7bb1a3d47f1be1196d69da5696d30702493724989ce9e11382407388abb9d45a.png
Sincerely, Francis
Hi Francis,
You’ve already done. Normally there is a tiny partition for Windows and then another one next to it with the remaining of your storage and you need to combine them. According to your screenshot, you already did combine them and you’re all set.
Hi!
Based on the answer that you gave Francis, should I delete “WinRe” or have I misunderstood? https://uploads.disquscdn.com/images/17c194e0ef269cc201f161342b4aa6a948617ea3b5ca58e3876672c8bac6c011.jpg
Last question, and maybe a dumb one… 🙂 Does this affect the warranty in any shape or form?
No that’s a 1GB recovery partition. You also have a full Windows partition now so you’re also done and all good.
And no nothing to do with warranty.
Hi David, does mine look ok? Why does my one have a 14GB onekey partition? https://uploads.disquscdn.com/images/4db380ba91e8c5009abbb8401d1f24c63d3c6f16bf412e0f05680569316758f9.jpg
Leave it. Rest looks good!