How to Install LUTs on the Blackmagic Ursa Mini
I recently did a post on how to update the Blackmagic Ursa Mini to the new Blackmagic Camera 4.0 update and one of the big reasons (besides the plethora of other ones) to update for me was to be able to preview LUTs in the camera finally (think of how a RED Camera can do this).
After I installed the update, I immediately took two of my favorite LUTs and tried to figure out how to transfer them to the camera. Scouring the web came up with exactly zero solutions so after some guessing I got it to work. I figured that since I couldn’t find the solution for putting the LUTs on the camera myself that others might want to know how to do this and so I’d do a quick post showing anyone interested (the other 4 people who own this camera besides me?) how to do that.
Download a LUT You Like

So first, we need to find a LUT that we want to put into the Ursa Mini. It comes with a simple Blackmagic Film to Video LUT but frankly I’d rather have a couple of others instead.
There are a ton to find on the web by simply searching for Blackmagic Ursa Mini LUT and by all means feel free to do that for any number of different looks you might want. So long as they are in .cube format this will work for any of them. I’m going to show you my two favorite LUTs at the moment though in case you aren’t sure which ones you want to use.
The first LUT is by well-known filmmaker Noam Kroll and is meant to mimic the look of the Arri Alexa on the Blackmagic Ursa Mini. You can download it from his page here (it’s the download link under the last photo of the dog).
The other is a darker LUT by a user on BMCUser’s forums named Frank Glencairn and it’s meant to give a very cinematic look to the footage (click the mega link in the first post on that page).
Once you’ve downloaded them to your computer’s desktop, unzip them if necessary so you have the .cube file on your desktop ultimately.
Install the LUT on the Blackmagic Ursa Mini
Now, here’s where the instructions on the web failed me. To install the LUT we need to put it on our camera’s CF Card.
1. To do that, use your CF Card adapter (if you don’t have one you can get a cheap one here that’s good) and plug it in to your computer and insert one of your CF Cards from the camera into it.
2. When it displays as a drive on the computer, simply drag and drop any LUTs you want onto it.
3. Once done transferring, simply eject the card from the computer, put it back into the camera and turn it on.
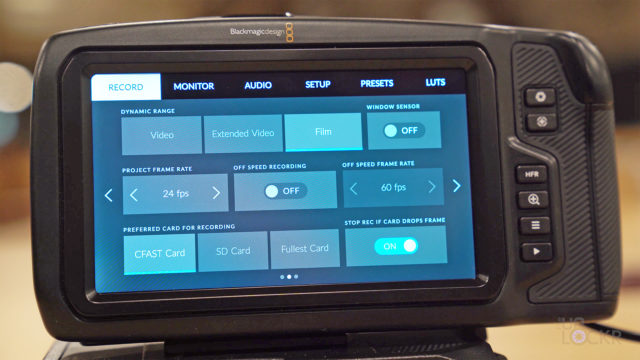
4. Now, in the new settings menu on the camera (if you don’t have the menu that looks like the menu below, please use my tutorial on how to update the firmware on your Ursa Mini first to get to the 4.0 version then you can continue from here after that), select LUTs.
5. Tap the two arrows at the bottom of the screen.
6. Tap Import LUT and tap the card you put the LUT on.
7. Tap the LUT you want to import and let it import it.
8. Once done, you can delete the LUT from the card if you want.
To View the LUT in the Camera
1. You can then view this LUT by going to the Settings menu again, then tapping on LUTs.
2. Select the LUT you want, and tap the check at the bottom left to apply it (if you still don’t see the LUT being displayed, check the Monitor settings and make sure the Preview 3D LUT is on for whatever monitor you are trying to use –the LCD is the built in display, for example).
And now you can preview the LUT on whatever you are currently shooting. Cool, right?
That’s not the only benefit of these LUTs though, by the way. You can also use them in post, of course, to make the footage look just like the way you are seeing it in the camera (if you use the same LUT during editing that you are using in-camera to preview). You need to follow your editing software’s instructions for how to install the LUT for that specific program. I use Adobe Premiere on my Mac, so if you do as well, here’s how to install a LUT on that.
Hope that helps anyone who owns a Blackmagic Ursa Mini and was trying to figure that out. Let me know if it did in the comments below. Thanks for reading!


Thanks for this great tutorial! I just got up and running with my Ursa Mini 4.6k, and ran into an issue. I shot in Film mode, and monitored with the Alexa LUT. Then in Premire, when I applied the LUT, the image was super saturated and overexposed, and looked nothing like what I was monitoring while shooting (the ungraded clip was fine before LUT). Any idea what went wrong? I had a IR cut and ND filter on my lense, would that mess with things? Thanks for any help.
So it sounds like you didn’t shoot in RAW. You need to be in RAW so you have a flat base to apply the LUT to. Otherwise if you shoot in Video color for example it has color baked in already and your LUT you put on top will add on top of that color, making it double colored and mess it up.
legend! just what I was looking for 🙂
Ha, happy I could help!
Great tutorial but I have a question. I loaded a .cube file onto the card and inserted it into the camera. However, it doesn’t show up under luts. Just the standard film to Rec.709… Any ideas? Am i missing something obvious.
You need to tap the two arrows in the LUTs menu and then tap inport and choose the CF Card. Then once imported you’ll be able to see them under LUTs.