Sony A7III Complete Walkthrough
Finally got my hands on the new Sony A7III, the “basic” new full-frame camera from Sony that is anything but. Since you guys seem to be liking the complete walkthrough series for phones, laptops, etc. I’ve been doing, I figured let’s do one on this camera that I’m excited about and you guys can let me know what you think.
If you aren’t familiar with my complete walkthroughs, they’re a series of videos where I try and go through as many features on a piece of technology that I can so that you can be better prepared should you want to go out and buy one.
Sony A7III Body & Design
With that said, there’s a lot to cover with the Sony A73, so let’s get started with the body and design.
As Sony’s latest mirrorless camera it continues the same smaller form factor. The device measures just under 4″ tall, 5″ wide, and 3″ deep and weighs about 1lb 7oz.


It’s made out of a magnesium allow with a rubber grip on the handle made out of rubber.


At the top, we have our multi-interface shoe for attaching accessories like flashes, monitors, etc. Next to that, our shooting mode dial (the modes of which we’ll go through in a bit).


Then we have two of our custom function buttons that you can set to do various actions from within the camera settings and the custom function wheel that you can set to do a custom variable action from within the camera settings.


Our exposure adjustment wheel to add or remove stops of exposure quickly.
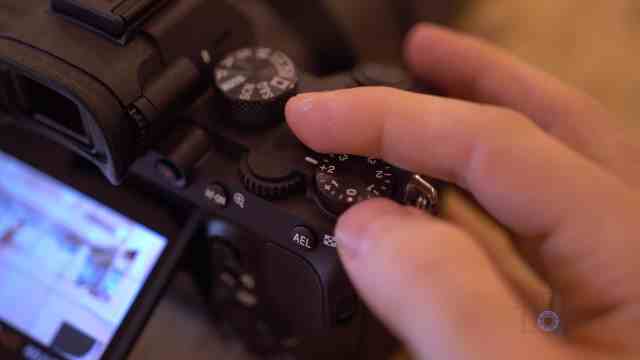
And, of course, our on/off toggle around our shutter button.


On the right side, we have our dual SD card slots. The second of which also doubles as a Memory Stick Duo port, as well.

On the left, our 3.5mm stereo microphone mini jack, our 3.5mm headphone jack, micro HDMI port capable of 4K still or 4K uncompressed video out and BRAVIA Sync which is their control over HDMI, USB 3.1 Gen 1 port, and a Sony Multiport/MicroUSB port.

On the front, we have the full-frame 35mm sensor under our Sony E mount metallic lens mount, another custom function wheel you can use, and our AF illuminator/self-timer lamp.


On the back, we have our large 2.95″ TFT touchscreen monitor that can tilt up by 107 degrees and down by 41 degrees. No flip out screen sadly for those wanting to use it to film themselves (like some of us like to do).


We also have our third custom button, menu button, XGA OLED viewfinder, rear-mounted video recording button, auto-focus toggle that also enables magnification in the LCD screen, our Auto Exposure Lock button which also shows images in a grid or even a monthly view if pushed during playback.


We have our handy joystick for selecting items on the screen, as well as fine-tune the autofocus spot selection after you tap the screen to focus on a spot.

Under that, we have the function key for bringing up common adjustments like shooting mode, autofocus mode, exposure compensation, ISO, etc.

Then there is the dial wheel that can be used to select things on the screen with the button in the middle and using the ring as a d-pad or spun as a dial as well as get to quick settings while shooting like the display mode, ISO, and the shooting mode/timer settings.

And at near the bottom of the back, we have the playback button and our delete button that can also be setup as our fourth custom key in the camera settings.

At the bottom of the Sony A7III, we have the standard threaded mount for a tripod, etc. and our battery door which accepts the new Z-style NP-FZ100 and even has a small slot for a cable to come out when using a faux battery accessory.


Battery life is rated by Sony at 710 shots using the LCD, 610 if using the viewfinder, or 125 mins of movie recording.
Lastly, the body, buttons, and dials are sealed for weather protection, but Sony warns that they are not 100% dust and moisture proof.
Imaging Sensor
The sensor inside the Sony A7 III is a 24.2MP full-frame 35mm Exmos R CMOS sensor. This translates to 6000×4000 pixels in 3:2 aspect ratio or 6000×3376 in 16:9. For video, it’s capable of capturing 4K in up to 30fps and 1080P in up to 120fps. Since the pixel is technically 6K in size, it oversamples this and brings it down to 4K for even sharper 4K (as most of Sony’s latest Alpha Series do).

The A73 also has Image Sensor-Shift stabilization with 5-axis compensation built into the body.
Sony A7III Software
Now, let’s dive into some of the software settings and capabilities of the Sony A7III as quick as we can.
The A73 has the following shooting modes:
- Intelligent Auto: All settings are handled by the camera and it’ll even try to identify the scene from the list of 11 scenes (which we’ll go through in a bit).
- Program Auto: Exposure is automatically handles by the camera so the aperture and shutter speed cannot be adjusted but other shooting settings can.
- Aperture Priority: This allows you to change the aperture manually but the shutter speed is adjusted automatically for you. Meant to let you get a better defocused background.
- Shutter Priority: This allows you to adjust the shutter speed but the aperture is handled by the camera. This is good for if you want to try and get a long exposure shot or to create trails in the image to show movemnet.
- Manual: None of the camera settings are handled by the camera and you can manually adjust them all.
- Custom 1 & 2: You can change whatever settings you want in settings and save them as presets to these two options.
- Movie Mode: Sets the camera to record videos.
- S&Q: Slow-motion and Quick-motion and you can
- SCN: Manual scene selection mode lets you choose from the 11 different modes that it chooses automatically in intelligent auto mode.
The different scenes it can auto-detect are:
 (Portrait)
- (Infant)
- (Night Portrait)
- (Night Scene)
- (Backlight Portrait)
- (Backlight)
- (Landscape)
- (Macro)
- (Spotlight)
- (Low Light)
- (Night Scene using a tripod)
 (
( (
( (
( (
( (
( (
( (
( (
( (
( (
( (
(But, in scene selection mode, you can only choose from portrait, sports action, macro, landscape, sunset, night scene, and night portrait.
Going through the camera settings, we have the ability to shoot photos in either JPEG in Extra-fine, fine, or standard, RAW in either compressed or uncompressed, or JPEG and RAW at the same time. The JPEG size can also be 20MP, 8.7MP, or 5.1MP and can be in either 16:9 or 3:2 aspect ratio.
")
")
The device also has a neat feature that I’m a fan of coming from another camera with a smaller sensor size that allows me to not have to immediately go buy all new lenses. It’s called APS-C/Super 35mm mode and it allows you to use lenses meant for those specific sizes on the larger full-frame sensor of the A7III. With it set on it’ll automatically detect those lenses and adjust the capture to only use that portion of the sensor so there is no vignetting.

There are also a ton of different creative styles and picture effects you can select from including ones for vivid colors, sepia, black and white, neutral, and a bunch more.
Like most Sony cameras, we have different picture profiles. These are examples of various different gamma and color profiles on the camera (but you can also adjust these further if you want, as well).
- PP1: Movie gamma.
- PP2: Still gamma.
- PP3: Natural tone using ITU709 gamma.
- PP4: A faithful tone of the ITU709 gamma.
- PP5: Cine1 gamma.
- PP6: Cine2 gamma.
- PP7: Sony’s SLog2 profile for increased dynamic range (but requires more post-editing).
- PP8: Sony’s SLog3 with their SGamma3 Cine color (also for increased dynamic range but requires more post-editing).
- PP9: Sony’s SLog3 with their SGamma3 color (also for increased dynamic range but requires more post-editing).
- PP10: Hybrid Log Gamma. This is the profile you would use to be able to record in HDR on the camera or High Dynamic Range. This means much higher contrast, more colors, and more shades of the colors but will only work if the device playing the video back is HDR capable.
The different drive modes available for shooting are:
- Single Shooting: Normal shooting mode.
- Continuous Shooting: Allows you to hold down the shutter button to continuously take photos until you let off of it.
- Self-Timer: Allows you to set a timer between when the shutter is pressed and the photo is taken (10, 5, and 2-second options).
- Self-Timer Continuous: Will take either 3 or 5 images in a row with the self-timer of 10, 5, or 2 seconds in between each shot when the shutter is pressed once.
- Continuous Bracket: Takes multiple photos while holding down the shutter button each with different exposures. You can choose between 3, 5, or 9 images and either 0.3, 0.5, 0.7, 1, 2, or 3 stops of exposure.
- Single Bracket: Similar to the continuous bracket but requires you to press the shutter in between each photo.
- White Balance Bracket: Takes three photos each with different color tones.
- DRO Bracket: Shoots 3 images each with different degrees of the Dynamic Range Optimizer enabled (a sort of auto HDR mode like what we see in popular cell phones like the Pixel 2, for example).
The Sony A7III also has focus peaking that can be set to different levels and colors to help you identify what is in focus in your image when you have it set to manual focus. It also has exposure zebra settings that allow you to set a certain brightness level and it’ll highlight that level with a zebra pattern. You can set it to the brightness you are looking for to see everything correctly exposed in the zebra pattern or set it to a minimum value and it’ll show you anything in zebra that is over that value to check for overexposure.

You can also register people’s faces and the camera will automatically try to adjust the focus to make sure those people are in focus for photos.

On the video side, we have XAVC S 4K, XAVC S HD and AVCHD formats to choose from (with the XAVC S 4K being the only way of shooting in 4K resolution). And we can select between 30 or 24 fps at either 100 or 60 Mbps data rates for 4K, or we can go from 24 fps at 50 Mbps all the way up to 120 fps at 100 Mbps in 1080P.
You can also select Slow and Quick from the mode dial and change the settings in the menu options to what frame rate you want to record at vs what frame rate you want to play back at and have the camera easily make slow motion shots for you at 1080P without having to drop down to that resolution manually.
Something cool I found in here was the ability for the camera to also record proxy files. These are lower resolution versions of whatever you are filming that are also saved at the same time. These are 720P and can easily be used for an off-site editor to work with without having to have the faster internet speeds, or can even be sent directly to the phone using the Sony PlayMemories app and edited and share to social from that.

The camera has a cool zoom feature that allows it to control any lens with power zoom capabilities via the dial on the camera for smoother zooming but also has a ClearZoom function that is a digital zoom that minimizes the deterioration of the image but only zooms in a small distance. Still, not a bad option to get just a little closer to a subject even if your lens can’t optically do so.

For connectivity, you can send images to phone or computer using the wifi direct and Sony PlayMemories app (you can even send videos but only proxy 720P versions of the 4K videos or the full version of the 1080P videos. You can add a file server info into the camera to send directly via FTP, or beam to TV using Wi-Fi Direct.
There’s also an option to control the A73 using a smartphone (and you can even use NFC by tapping the back of your phone to the NFC symbol on the right of the camera.

You can also organize your photos by creating folders to save to directly on the camera and even create a custom menu for your most used settings.
Sony A7III Sample Photos and Videos
Sample photos and videos here on Google Drive.
Sony A7III Price and Release Date
Finally, the Sony A7III price is $1,999 for the body only and the best deal I could find was on B&H with some freebies added on here already or on Amazon here.
Also, since I’ve been a member of WeWork for over 2 years now and love it, I asked them about giving any of you guys that might want to try it a discount. If you sign up here using my link for a free tour of a local WeWork near you (they’re all over the world) you can get up to 20% off your first year.
Let me know what you guys thought of me doing a complete walkthrough of the Sony A7III (and cameras in particular). Would you want to see me do more of them? And what do you think of this camera (I think it might be my next camera frankly)?

Hey David , Just received the Ronins s Gymbal for the Sony A73
The problem I’m having is the A73 keeps shutting off. seems like it’s timing out but i can’t figure it.
Sorry, never used the Ronin S. Best bet is to contact Sony support honestly. Sorry!
Thanks DavidI got it figured out.The power save made was set to 1 minute. Cheers.
A.Campos
Sent from Yahoo Mail for iPhone
Ah that’ll do it lol Glad you got it sorted!